Subscribing to Swapcard's webhooks
You can register to Swapcard's webhooks to subscribe to specific events that occur on Swapcard.
Getting started
The destination endpoint designed to capture the data must be equipped to process HTTP POST requests, with each notification delivered in JSON format detailing individual changes as they occur.
Setting up webhooks
To set up a webhook subscription, you will need to provide the following information:
- Your endpoint's URL (Ex:
https://webhook-test.com/webhookId)- A secret for request verification (Optional)
- The particular actions to which you intend to subscribe (cf Webhook events)
Once all the information above is gathered, webhooks can be set up in two ways:
-
Option 1:
-
On studio menu, go to the
Integrationstab, then click on theWebhookstab
-
After it click on the right top button
Create a webhook. -
And by last set the name, select the events you want to subscribe to, paste the endpoint URL and the secret and click on
Createbutton.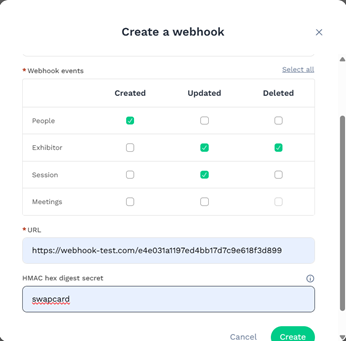
-
-
Option 2:
Validating the deliveries
The notifications delivered will contain a hash signature in the X-Signature-256 header. This should be used to validate that the data you received comes from Swapcard. This is done through a HMAC hex digest of the request body using the secret you provided when setting up as the key.
How to test the validation
Let's consider you received a request with the following body:
{
  "context": {},
  "event_profile": {
  },
  "action": "profile_create",
  "datetime": "2024-04-01T00:00:00.000Z"
}
And you provided Swapcard with the secret my_secret.
If the HMAC is properly digested, the hex output should be: dabe126d047775d1685e1a28eef57381dc2b31688a49959802c1f9b72a569590.
Meaning that in the request received, the X-Signature-256 header should be sha256=dabe126d047775d1685e1a28eef57381dc2b31688a49959802c1f9b72a569590. Remember to use a constant-time comparison function to avoid timing attacks. Here's an example in golang.
Using the developer API to manage your subscriptions
The developer API provide a set of queries and mutations that allow you to :
Creating a webhook subscription
GraphQL mutation
mutation CreateWebhook ($input: CreateWebhookInput!) {
  createWebhook(input: $input) {
    webhook {
      id
      endpoint
      enabled
      hooks
    }
  }
}
Payload
{
  "input": {
    "eventId": "RXZlbnRfMTgxMDBxOA==",  // Your event ID
    "endpoint": "https://test.com",     // Your endpoint URL where the webhook will be sent
    "secret": "your-secret",            // To generate the hash signature header to validate that the sender is us
    "hooks": [                          // The list of hook you would like to subscribe to :
      "EXHIBITOR_CREATE",               //  * PROFILE_CREATE, PROFILE_UPDATE
      "EXHIBITOR_UPDATE"                //  * EXHIBITOR_CREATE, EXHIBITOR_UPDATE
    ]                                   //  * PLANNING_CREATE, PLANNING_UPDATE
  }
}
Updating an existing webhook subscription
GraphQL mutation
mutation UpdateWebhook ($input: UpdateWebhookInput!) {
  updateWebhook(input: $input) {
    webhook {
      id
      endpoint
      enabled
      hooks
    }
  }
}
Payload
{
  "input": {
    "webhookId": "66a35ec0aec654a42f7648b5",   // The Swapcard's subscription UUID
    "endpoint": "https://test.com",            // The updated endpoint. If not provided, the data won't be changed.
    "hooks": [                                 // The new webhook list. If not provided, the list won't be changed.
      "PROFILE_CREATE",
      "EXHIBITOR_CREATE"
    ]
  }
}
Deleting an existing webhook subscription
GraphQL mutation
mutation DeleteWebhook ($input: DeleteWebhookInput!) {
  deleteWebhook(input: $input) {
    webhook {
      id
    }
  }
}
Payload
{
  "input": {
    "webhookId": "66a35ec0aec654a42f7648b5",   // The Swapcard's subscription UUID
  }
}
Listing event webhook subscriptions
GraphQL query
query GetEvent ($eventId: ID!) {
  event(id: $eventId) {
    ...EventDetails
  }
}

fragment EventDetails on Event {
  webhooks(filters: {enabled: true}) {
    id
    endpoint
    enabled
    hooks
  }
}
Payload
{
  "eventId": "RXZlbnReMTgxMDBxOA=="
}
Note: Swapcard enforces a maximum of 20 webhook subscriptions per event. If you reach the max limit, delete or disable unused webhooks before creating new ones. This is particularly relevant when using the API programmatically, as it's easy to create duplicate subscriptions unintentionally.